This is an old revision of the document!
Table of Contents
Eubrewnet User Manual
1. Software setup and data submission
Each Brewer spectrophotometer communicates with a local PC where the raw data is stored. To upload the raw data from the client PC to the Eubrewnet database, a code written in Python 2.7 has to be installed in the local PC (or any other computer which has access to the Brewer raw data). When this code is executed the local (client) PC connects to Eubrewnet's data server. Then, the local Brewer files and all related information (file size, modification date, etc) are compared to the data already stored in Eubrewnet. Only the files which are either new or have changed are then submitted. This process should be repeated at regular time intervals (~15 mins).
This Section provides information to download and setup Eubrewnet's client software in your local PC. A quick setup guide is provided in Sec. 1.1. In Sec. 1.2 we describe in detail how to setup and configure the software. Finally, Sec. 1.3 contains a FAQ.
1.1. Quick setup guide
1.1.1. Download Eubrewnet's client
Either
a) Download the client executable for Windows from http://rbcce.aemet.es/eubrewnet/static/files/client_exe.zip
or
b) Setup the Python 2.7 interpreter in your computer, and then download the client Python script from http://rbcce.aemet.es/eubrewnet/static/files/client_python.zip
1.1.2. Unzip the downloaded file to a pre-existing folder
1.1.3. Configure the client.ini file
Open the example_client.ini file which was included in the zip. It contains the following lines
[global]
brewerid=157
working_dir=.
input=c:\brewer#157\bdata157
servers=iberonesia3
proxy=proxy.xxx.xxx:port

[iberonesia3]
url=http://rbcce.aemet.es/refresh
db=iberonesia3.db
noproxy=yes
Write your Brewer ID number in the brewerid= line.
In the input= line, write the full path to the folder with your B files.
Is your PC behind a proxy? If the answer is
- No: then do not change the line noproxy=yes
- Yes: change the line to noproxy=no, and write the proxy's address and port in the proxy= line
Once you have finished editing the file, save it as client.ini in the same folder where refresh.exe or refresh.py reside.
1.1.4. Execute the client
In the case of the client executable, just double click on refresh.exe.
To execute the Python script, open a console/terminal, change to your work directory, and use the command python refresh.py.
In both cases, you should see some information on the screen, but note that the window might open and close quite fast if you double-clicked on refresh.exe in Windows.
To save a log file, if using the client executable, run it from the console with the command refresh.exe >client.log. If using the Python script, use the command python refresh.py > client.log
1.1.5. Create an automated task
We recommend running the client automatically every ~15 minutes. In the case of Windows, look for information on the Windows Task Scheduler for your Windows OS version. For *nix systems, check the crontab command.
1.2. Extended guide
1.2.1. Software setup
Eubrewnet distributes its client software in two different zip files, one with a compiled binary and another with the Python 2.7 script and related libraries.
a) The compiled binary (.exe file) for Windows
This is the preferred option for PCs running Windows. It has been tested under Windows XP and 10.
The file is available at http://rbcce.aemet.es/eubrewnet/static/files/client_exe.zip
After the download, unzip the file to your preferred location, edit the client.ini file (see below), and double click on refresh.exe to submit your data
b) Python script for all operating systems with a Python 2.7 interpreter installed
As of 2019-09-24, the latest release for Python 2.7 is available at https://www.python.org/downloads/release/python-2716/. *nix systems usually come with Python preinstalled – if not, please check the package repositories of your distribution.
After the Python 2.7 interpreter has been installed in your system, please make sure that is included in your path – open a console and try to execute python (if Python successfully starts, use exit() to end the interpreter).
Once Python 2.7 is up and running, download Eubrewnet's client software from http://rbcce.aemet.es/eubrewnet/static/files/client_python.zip. Then, unzip the file to your preferred location, edit the client.ini file, and run the script from a console with python refresh.py to submit your data
1.2.2. The client.ini file
The client.ini file provides all the configuration required by Eubrewnet's client to submit your data. For simplicity, it should be placed in the same folder as your refresh.exe or refresh.py file.
We will now examine a full-featured client.ini file, although we highly suggest you to check the simplified example provided in the Quick setup guide – nothing else is required!
[global]
brewerid=017
working_dir=.
input=c:\brewer#017\bdata017
servers=iberonesia3, are2019_wifi
proxy=proxy.inta.es:5672

[iberonesia3]
url=http://rbcce.aemet.es/refresh
db=iberonesia3_017.db
noproxy=yes
serverport=8081

[are2019_wifi]
url=http://10.0.10.212/refresh
db=iberonesia3_2.db
noproxy=yes
serverport=8081
In the example above, the [global] section allows you to specify your Brewer ID in the brewerid= line. The working_dir= line lets you specify a directory where the local database files (see below) will be placed – we recommend keeping all files in the same directory using workingdir=..
The input= line is perhaps the most important of this section – it tells Eubrewnet's client where to look for your B files. Note that newer versions of the software will also look for files inside specific subfolders hanging from the one defined in input=, check the information printed on the screen when you run the client.
The client.ini file also allows you to define the submission server. The servers= line in the [global] section lets you specify the names of one or more sections in which you can define the submission server URL and other details. We will discuss this sections in a moment, but for now, note that in this example the servers=iberonesia3, are2019_wifi points to the two remaining sections of the client.ini file, namely [iberonesia3] and [are2019_wifi]
The last line of the [global] section lets you specify the address and port of your network's proxy server (if there is one). Please contact your sysadmin for your proxy's details.
As we just mentioned, the client.ini shown above includes three sections, because we have two sections ([iberonesia3] and [are2019_wifi]) to define two different addresses for the submission servers – unless you're at a calibration campaign or work at the RBCCE, you won't likely see this kind of setup!
Besides the submission server URL, sections [iberonesia3] and [are2019_wifi] allow the user to define other settings specific for each connection. In particular, the line db= defines a file to be used as local database, where a copy of some data available at Eubrewnet's database will be stored. This speeds up the submission process, but the first time you run Eubrewnet's client in a new computer, it will take some time to generate the full local database. Newer versions of Eubrewnet's client will provide basic information about this process.
The noproxy= line is used to specify if the proxy server defined in the [global] section has to be used for this connection or not. noproxy=yes means that the proxy will not be used. noproxy=no means that the proxy will be used.
Finally, note that the serverport= line is currently not used, so fell free to remove it.
1.2.3. Command line options
To run Eubrewnet's client, you do not need to use any command line options – all the required configuration parameters can be specified in the client.ini file. So, unless you have very specific needs, we do not recommend using the command line options. In any case, we next provide a brief list of the command line options available.
-b: sets the Brewer ID number
-s: allows the user to specify the submission server. Must point to a section in the client.ini file
-i: sets the path to the folder with the B files
-c: allows to select a client.ini file besides the default one
-v: verbosity level. Newer versions of Eubrewnet's software are very verbose by default, so this option is no longer useful.
-r: (only available in the most recent versions of Eubrewnet's client) look for files to submit in all the subdirectories hanging from the input= one, at any level. Note that this process can take quite a lot of time!
1.2.4. Checking the communication with the server
On the local PC running the client sofware, open a web browser and try to access http://rbcce.aemet.es/eubrewnet. If Eubrewnet's website doesn't load, check your network settings – in particular, contact your system manager and ask if you need to set up a proxy.
For debugging, it is recommended to execute the client software redirecting all the output to a log file. If running the client executable, open a console in Windows, change to the folder where refresh.exe is located and run the command
refresh.exe >client.log
In *nix systems, cd into refresh.py's directory and execute the command
python refresh.py >client.log
If you notice error messages in the client.log file, please send it to eubrewnet@aemet.es
1.3. Frequently Asked Questions
Q During my trials I’ve got an error: Syntax error: Invalid syntax
A Make sure you're using Python 2.7 and not 3. A Python 3-compatible version of Eubrewnet's client software will be provided in the near future.
Q We are using a unix database ourselves, so one possibility is to transfer the data automatically from that to your database.
A Eubrewnet requires the original Brewer files. Direct communication between databases is not considered at this moment.
Q What is the best way? Ftp is easy for us to implement via the built-in scheduler in Windows.
A There are no plans to allow submissions via FTP. Please check the Quick guide above – we're sure that you will find that Eubrewnet's client is very easy to use and automatize. And if you have any problem setting up the software, don't hesitate to contact us at eubrewnet@aemet.es
Q Do we have to send data in real time or are you planning to start with data files from past years?
A On each execution, Eubrewnet's client always checks all the files in the directory specified in the input= line of your client.ini
So, if you have all your files (new and old) in a single directory, they will all be checked and submitted if they are not already in Eubrewnet's database (or if they have been modified since they were submitted).
If you have old files in a subdirectory, you can modify client.ini's input= line and run Eubrewnet's software once.
Newer versions of Eubrewnet's client also provide a -r flag to look for files in all the subdirectories hanging from the one specified in the input= line. Just run the software with refresh.exe -r or python refresh.py -r to enable this functionality, but note that this might take a lot of time!
Q In case it would be real time data that you want, what would be the frequency at which we would have to send the data? (daily, weekly, monthly)?
A Eubrewnet's data server is capable of processing your data in near real time, so you can submit your files as often as you like! We suggest running Eubrewnet's client every ~15 minutes using an automated task.
Q We are very cautious with our Brewer computers and we (together with the IT staff from our institute) are not very keen to install something new on these computers.
A You are welcome to check the source code of Eubrewnet's software client – just download the Python script version and inspect the .py files, no other files besides those are used to generate the executable version of the client.
If you are worried about the possibility of getting your computer infected by a virus, please note that we run a virus scan on the executable version of Eubrewnet's client before we publish it on the web. Nevertheless, you also have the option to use the Python script version of Eubrewnet's client.
Finally, if for some reason you're still not allowed to run the software directly on the local PC connected to the Brewer, we suggest that you try to share the data with another computer under your full control and run the software on it.
Q I just sent you data from my computer: did you receive it?
A You can check the data yourself. The easiest way is perhaps to check the color of your Brewer on the map at http://rbcce.aemet.es/eubrewnet/default/index – Green or yellow is OK.
Another possibility is to use the “File Status Check” tool available at http://rbcce.aemet.es/eubrewnet/files/status. A status value of 0 for your file means everything is OK.
Also, please note that communication errors usually produce some messages in the output of Eubrewnet's client. If you want to debug these messages, we recommend running the client redirecting the output to a log file: you just have to use refresh.exe > client.log or python refresh.py > client.log, depending on the package you donwloaded.
Finally, please remember that you can always contact us at eubrewnet@aemet.es
Q I have already sent data files. Now, how to send the calibration files that usually are in the \data\###\ folder?
A Newer versions of Eubrewnet's software client will automatically check some folders hanging from the one specified in the input= line of the client.ini file – just take a look at the information printed on the screen.
If you're using an older version of the software, you can temporarily modify your input= line and run the client once.
Note that Eubrewnet's data server knows how to parse most files generated or used by Brewer instruments (and, if the file can't be automatically parsed, it will remain in the server waiting for us to check it manually!), so please don't hesitate to submit all the files you have!
Q My first attempt to send Brewer data finished with this error: xmlrpclib.ProtocolError: ProtocolError for rbcce.aemet.es/refresh/xmlrpc/: 403 Forbidden
A You can't connect to Eubrewnet's submission service.
Please, try to contact the refresh service from a web browser using the URL http://rbcce.aemet.es/refresh/xmlrpc/ – you should get a message like this
Error response

Error code 501.

Message: Unsupported method ('GET').

Error code explanation: 501 = Server does not support this operation.
If you don't get any answer from the refresh service, then your connection might be blocked by a proxy, please check with your sysadmin. Remember that if your computer is behind a proxy, your client.ini must include the line noproxy=no, and the proxy's address and port must be written in the line proxy=
If you're not behind a proxy, a firewall might be blocking the connection. Please contact your sysadmin.
Q There’s an error while running the client: xmlrpclib.Fault: (Fault1 : “(type ‘exceptions.AtributeError’): ‘NoneType’ object has no attribute ‘last_online’
A Most likely, the registration of your Brewer in Eubrewnet has not been completed yet. Please, contact us at eubrewnet@aemet.es
2. Configuration
The raw data (Brewer spectral measurements) sent to the Eubrewnet database have to be processed in order to get the final products (currently Total Ozone Column (O3) and sulfur dioxide (SO2) and in the future, Aerosol Optical Depth (AOD), spectral UV irradiance, Nitrogen dioxide (NO2), and ozone profiles). For this purpose, a number of instrumental and calibration constants have to be inserted in the data processing algorithm. The operator of each instrument is responsible for uploading and saving the configuration (i.e. the needed constants) for each product in the database. In addition to the configuration of each product, information regarding the station and the instruments should be also provided. A detailed list of all necessary configuration parameters and other useful information can be found in the following link:
http://rbcce.aemet.es/dokuwiki/doku.php?id=devel:eubrewnetconfiguration
Before uploading the configuration for the station and the products, the operators have to contact the system administrator (eubrewnet@aemet.es) and provide contact information and the list of Brewers for which they are responsible. Then, they have to register in the system. When the registration is complete they are able to login the website of Eubrewnet and upload the configuration. In the following there is a more detailed description of the configuration uploading process.
Registration and login
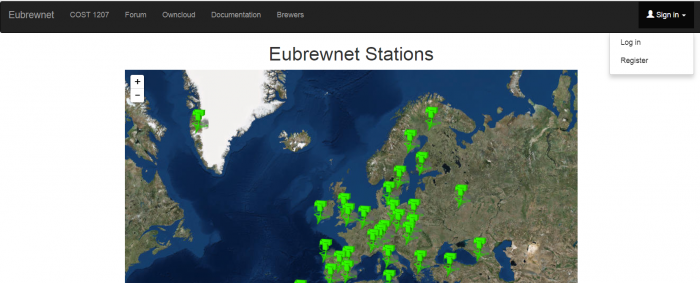
As shown in Figure 1, at the right of the Eubrewnet webpage the user can find the sign in button. There, he/she has two options: Register or Login. If Register is chosen, a form appears which should be filled by the database user. If Log in is chosen the user is asked for his username and password and then he can have full access to the database.
2.1. Station configuration
When a user is logged in he/she can edit/fill the station information. The option Stations should be chosen from the User list (see Figure 2). Then, by clicking on the name of the station, a form containing the station information appears. There, the user can add information or edit the form and submit the changes. The information can be added either by hand or by uploading a document which contains the station configuration information.
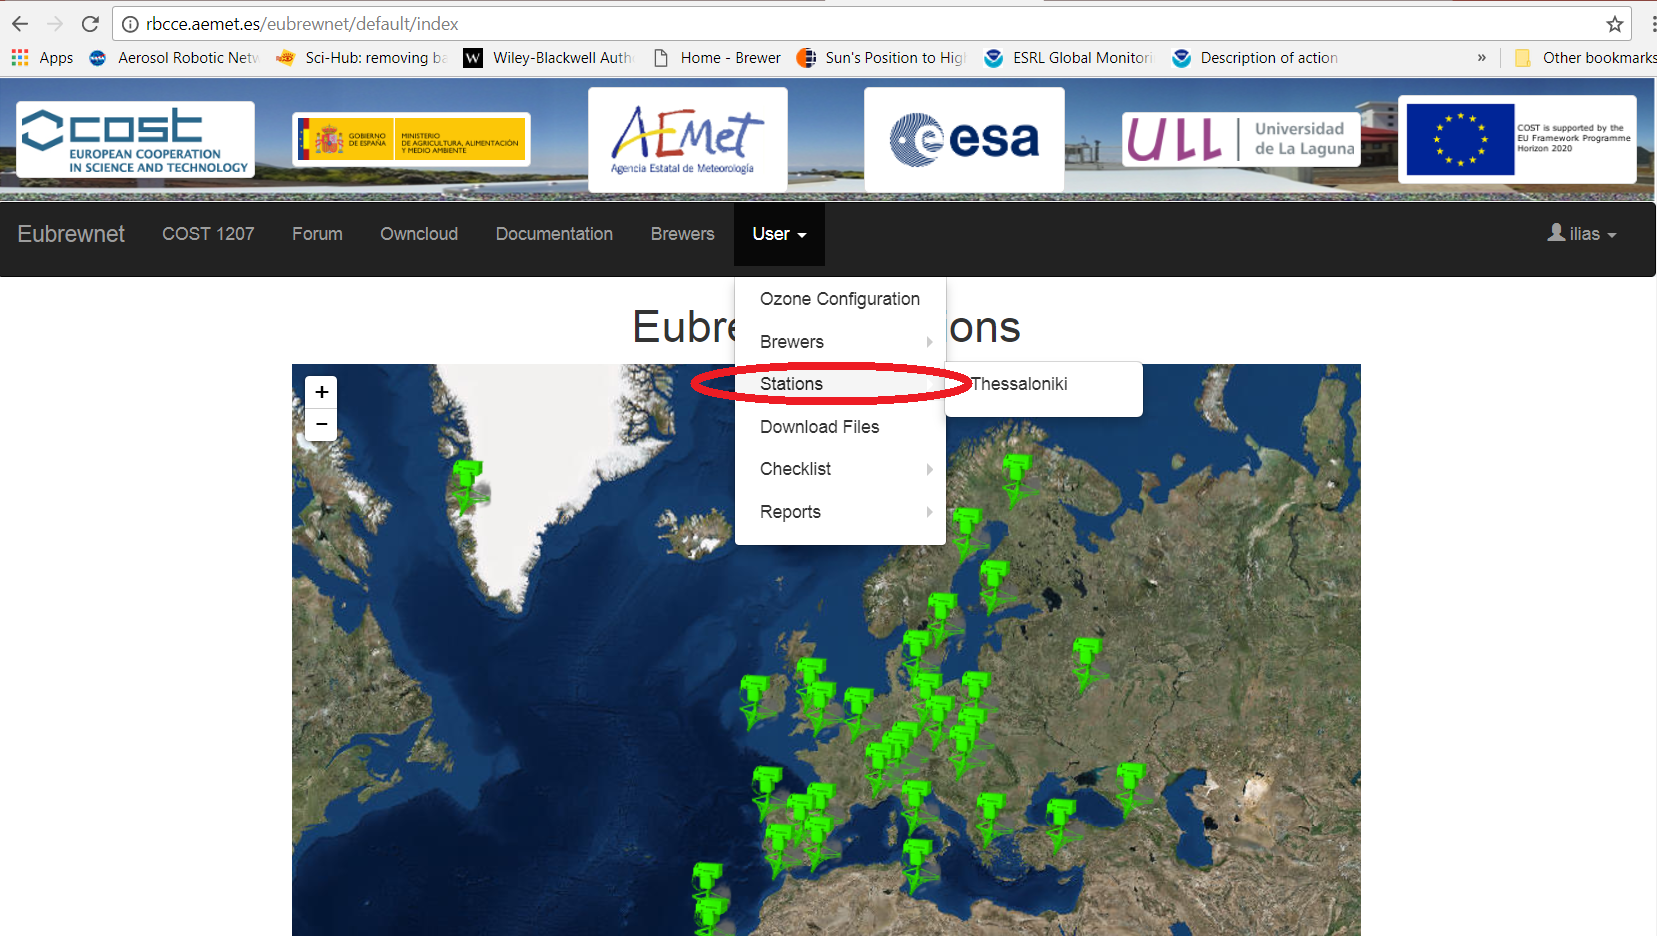 Figure 2: Accessing the station configuration form
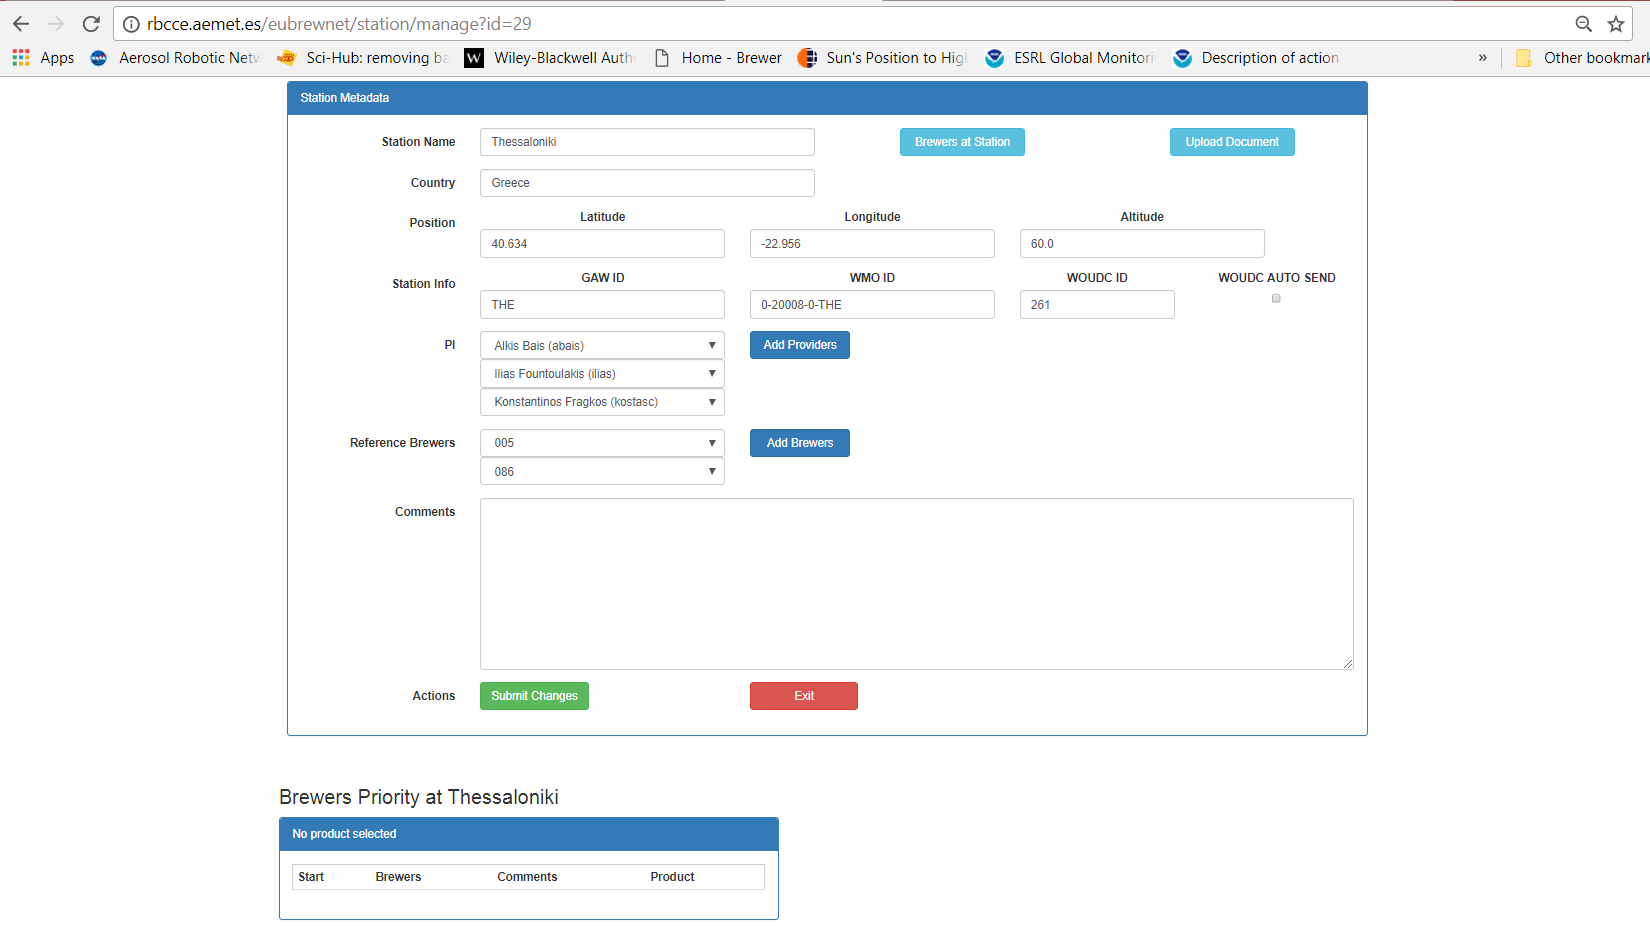 Figure 3: Example of the station configuration form.
2.2. Ozone configuration
As shown in Figure 4, the user can have access to the ozone configuration form by clicking on the Ozone Configuration option from the User list. In the ozone configuration form the user has the option to update the configuration for more products such as AOD and NO2, which however are not operational yet.
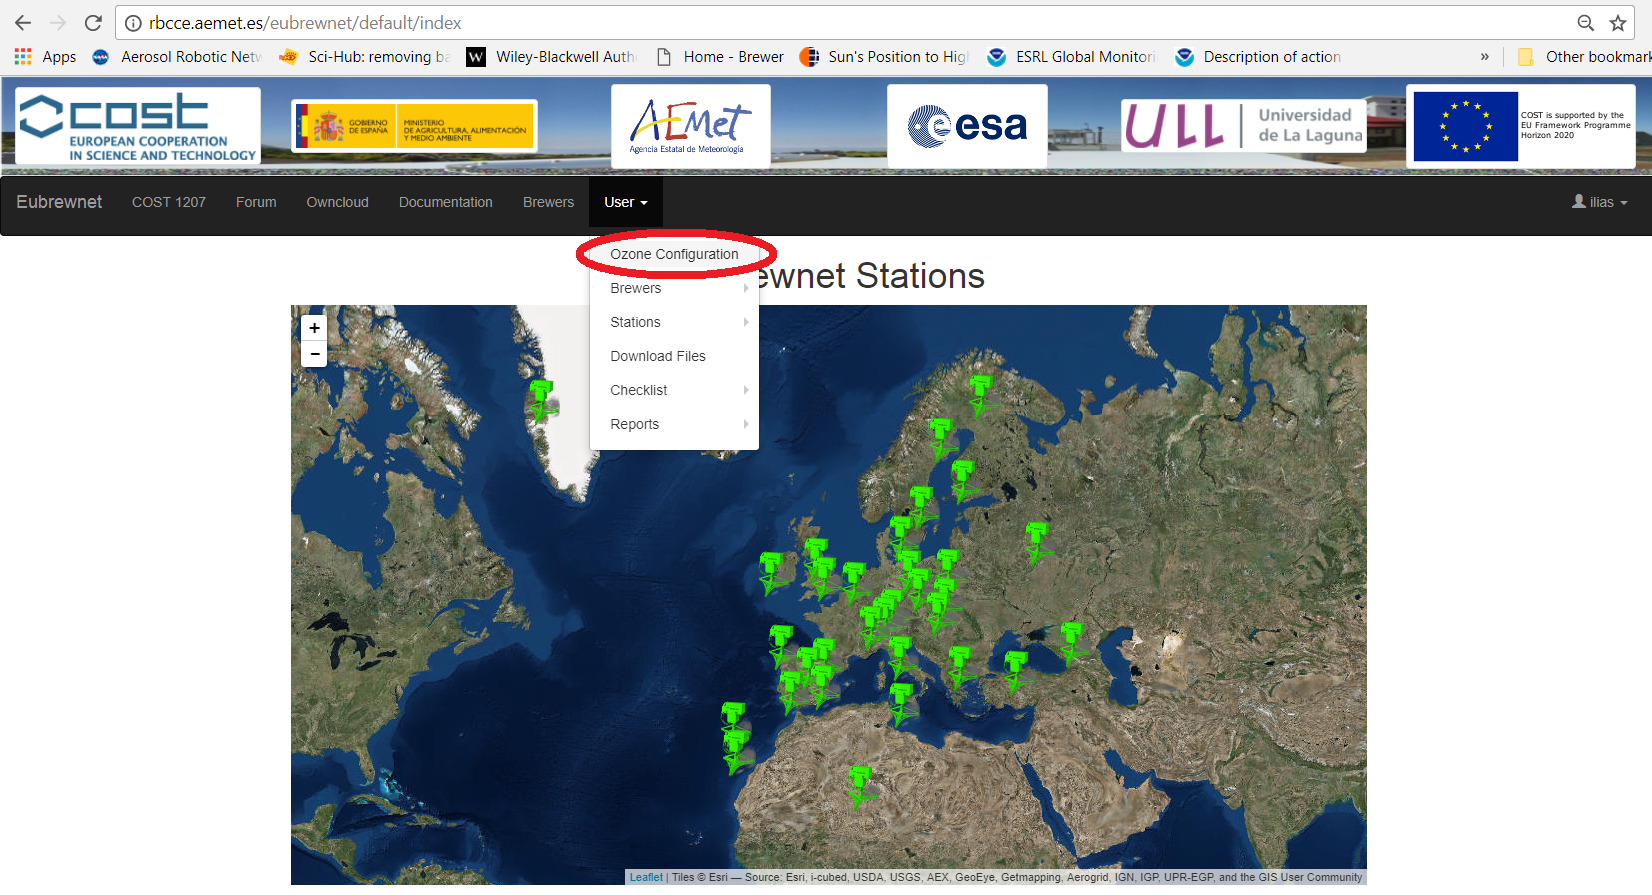 Figure 4: Access the ozone configuration form
The process begins by selecting the Brewer for which the configuration constants will change. Then, as shown in Figure 5, the user has three options:
- Add new configuration
- Modify configuration
- Download configuration
If the Download configuration option is chosen, the entire record of the configurations which have been either used in the past or are currently in use is downloaded in a single csv file.
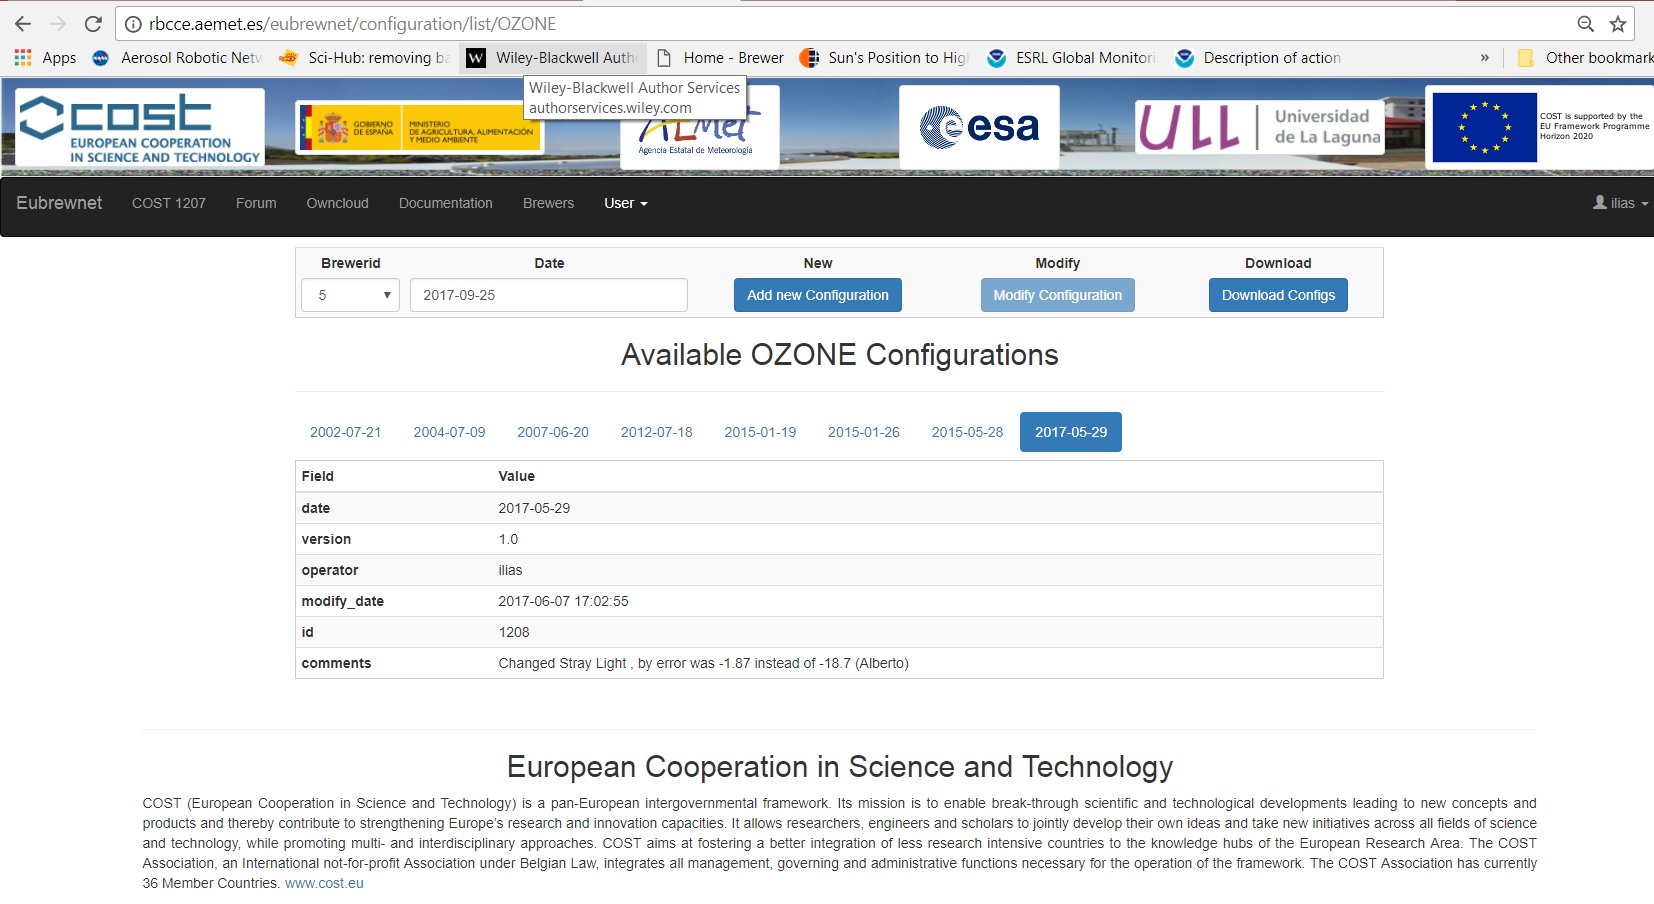 Figure 5: Example of the ozone configuration initial page.
If the user wants to modify an existing configuration then he\she has to choose the configuration version he/she wants to modify and press the Modify Configuration button. The date since which an existing configuration is valid cannot be changed. In this case the configuration has to be resubmitted as new. For adding a new configuration the user has to define the date in the Date box (next to the Brewerid box) since which the new configuration is valid, and then press the Add new configuration button.
By pressing the Add new Configuration or Modify Configuration buttons, a new form appears. In this form, the user has the option to either upload files which contain the new configuration constants (Figure 5), or modify the currently used configuration parameters and save them as new (or modified) configuration. In the Configuration and Actions section (Figure 6), in addition to the choice of uploading files with the new configuration parameters, the user has the following options: (i) to decide if the specific configuration is operative or inactive and (ii) to define if the generated product from the current configuration is level 2 or not. Level 2 is the level 1.5 product after it has been validated with a posterior calibration. In this section the user has also the options to either go back or submit the performed changes by clicking the corresponding buttons.
 Figure 6: Example of the “Configuration and Actions” section.
In the beginning of the Values to be submitted section, there are two lines of buttons. The buttons of the first line can be used to choose where the submitted configuration is applicable. The possible choices are:
● O3 and SO2
● AOD
● Umkehr
● Data and Metadata
● NO2
The AOD and Umkehr products are under development (at the time of writing this manual) and it is not possible to provide or edit any configuration constants. The configuration constants in the NO2 product and most variables in the Data and Metadata form are inactive, although they can be updated. Thus, analytical description is provided only for the O3 and SO2 configuration form. For the contents of the Data and Metadata and NO2 forms there is a brief description at the end of the section.
2.2.1. O3 and SO2
In the O3 and SO2 configuration form, the user can edit the Setup, Algorithm and Instrument constants by clicking on the corresponding button.
● Setup
In this form there are three tables which should be filled. The first is for the setup of the DS measurements (Figure 7). In the first raw the operator should provide the needed constants for the retrieval of the total ozone column (O3). These constants can be found in the used icf file (instrument configuration file). These are the extraterrestrial constant used for the determination of O3 (ETC O3), the ozone to ozone ratio (O3 Ratio on O3) and the R6 reference value (R6 Reference). If the “SL test O3 correction and recalculation” box is checked then the change of the R6 ratio relative to its reference value is taken into account for the calculation of O3. More specifically, the median of the R6 for each day is calculated and a 7 day (day of the calculations ± 3 days) triangular moving average is applied to calculate the R6 that will be used for the correction. If the difference between the reference and the calculated R6 exceeds 5 the difference is taken into account in the calculation of the O3.
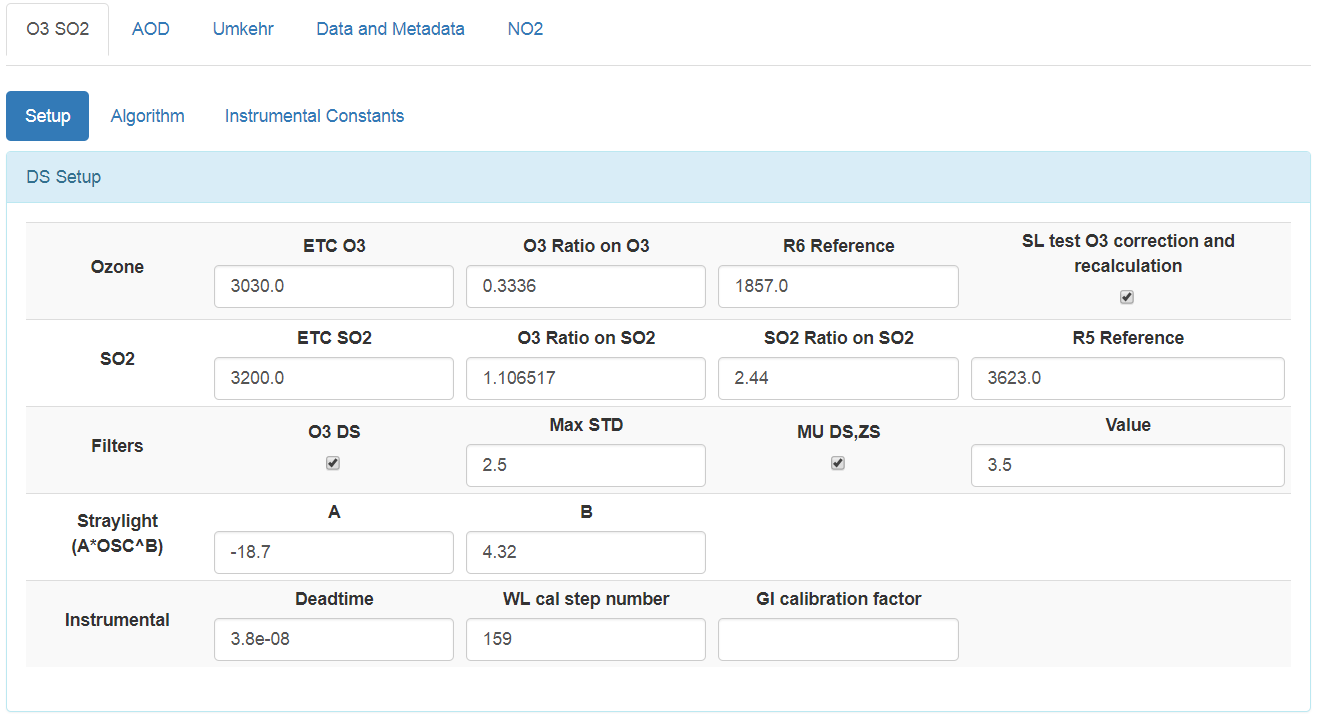 Figure 7: Example of the Table for the DS setup.
In the second line the operator should provide the needed constants for the retrieval of the total column of sulfur dioxide (SO2). The constants that have to be determined are the same as those described for ozone: the extraterrestrial constant used for the determination of SO2 (ETC SO2), the SO2 to SO2 ratio (SO2 Ratio on SO2) and the R5 reference value (R5 Reference). The ozone to SO2 ratio (SO2 Ratio on O3) should be also provided. The constant regarding the calculation of the SO2 can be also found in the icf file used for the period for which the specified configuration is valid.
In the third line the applied filters for the calculation of the level 1.5 and level 2 products are specified. Each single O3 and SO2 value is the mean of five consecutive measurements performed. If the operator chooses to use these filters, the O3 and SO2 (direct and zenith sky) measurements are considered to be valid only when the mean air mass (MU DS,ZS) and the standard deviation of the set of the five measurements (Max STD) are below specific limits, which can be determined by the operator, and by default are 3.5 and 2.5 DU respectively.
In the fourth line the parameters used for stray light correction are provided (A and B). These parameters are available only if the instrument has been properly characterized. In the fifth line the dead time of the photomultiplier tube (Deadtime), the zero position of the micrometer (WL cal step number) and the constant used for ozone measurements through the diffuser (GI calibration factor) are required. The former two are available in the icf file while the latter is available in the O3Brewer file (http://www.o3soft.eu/o3brewer.html).
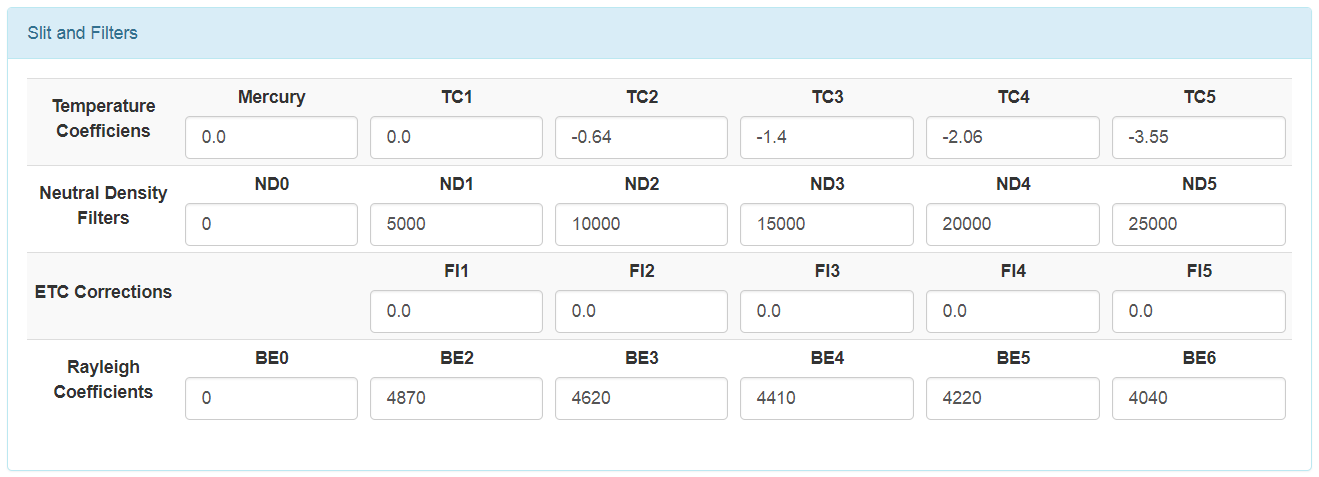 Figure 8: Example of the Table for the slit and the filters.
In the Slit and Filters table, there is information regarding the applied temperature and neutral density (ND) filter corrections, the individual ETC correction for each slit and the Rayleigh coefficients used in the ozone retrieval algorithm. The Temperature coefficients and the attenuation of the Neutral Density Filters can be found in the icf file. The ETC correction for each slit is determined during the ozone calibration of the Brewer and is provided in the report of the calibration. The Rayleigh coefficients are standard and can be found in the O3Brewer file.
The setup form contains one more table wherein the constants for the zenith sky measurements are determined. However, the specific product is still under development, thus the corresponding table is inactive.
● Algorithm
This form contains information regarding the Ozone Weights and the SO2 Weights for each slit, used in the algorithm for the retrieval of O3 and SO2 respectively. The values presented in Figure 9 are standard for all Brewer spectrophotometers.
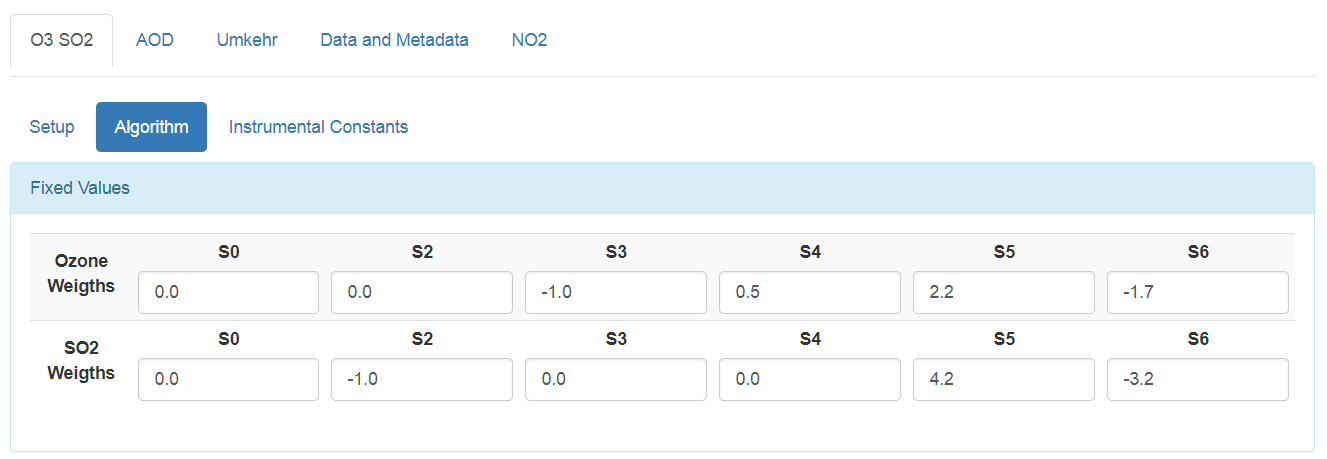 Figure 9: Example of the form for the algorithm constants.
● Instrumental constants
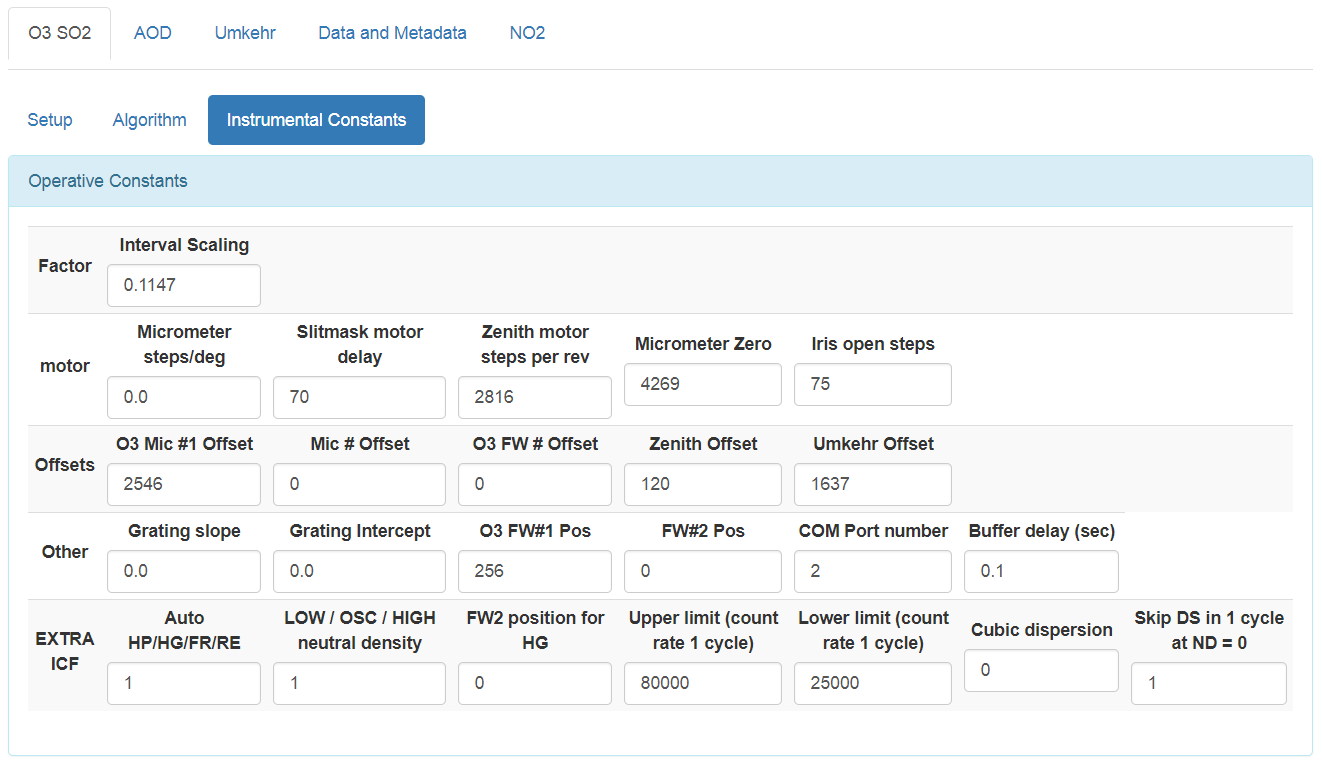
In this form the operational constants of the instrument should be provided. An example is provided in Figure 10. In the first line, the interval scaling factor is asked. This quantity is equal to the half of the integration time and is usually standard (equal to 0.1147). The constants provided in the next three lines can be all found in the operational icf file and are described in detail in the Brewer operator manual (http://www.kippzonen.com/Download/207/Brewer-MkIII-Operator-s-Manual?ShowInfo=true). The information provided in the last line (EXTRA ICF) is available in the icf files of the more recent versions of the Brewer operational software. The constants that have to be filled in this last line are:
● Auto HP/HG/FR/RE: Defines whether or not HP/HG/FR/RE are done automatically when the instrument recovers and begin operating again after an unexpected error (e.g. communication failure) and if HP is automatically performed before HG for MKIII Brewers. The possible values are 1 (yes) and 0 (no).
● LOW / OSC / HIGH neutral density: Defines how the ND filter disk moves when testing intensity. The possible values are 0 and -1 for going to lower or higher attenuation filter respectively, or 1 when the disk oscillates and either a higher or a lower attenuation ND filter can be chosen.
● FW2 position for HG: Defines the position of the filter wheel #2 (used ND filter) when the Hg test is performed.
● Upper limit (count rate 1 cycle): Defines the upper limit for count rate at 1 cycle that is acceptable before switching to lower FW2 position. Standard is 80000.
● Lower limit (count rate 1 cycle): Defines the lower limit for count rate at 1 cycle that is acceptable before switching to higher FW2 position. Standard is 25000.
● Cubic dispersion: If the dispersion coefficients have been calculated using a cubic polynomial then the specific value is set to 1, else it is set to 0.
● Skip DS in 1 cycle at ND = 0: If 1 then DS is skipped if less than 500 counts are measured in 1 cycle using ND = 0.
2.2.2. Data and Metadata
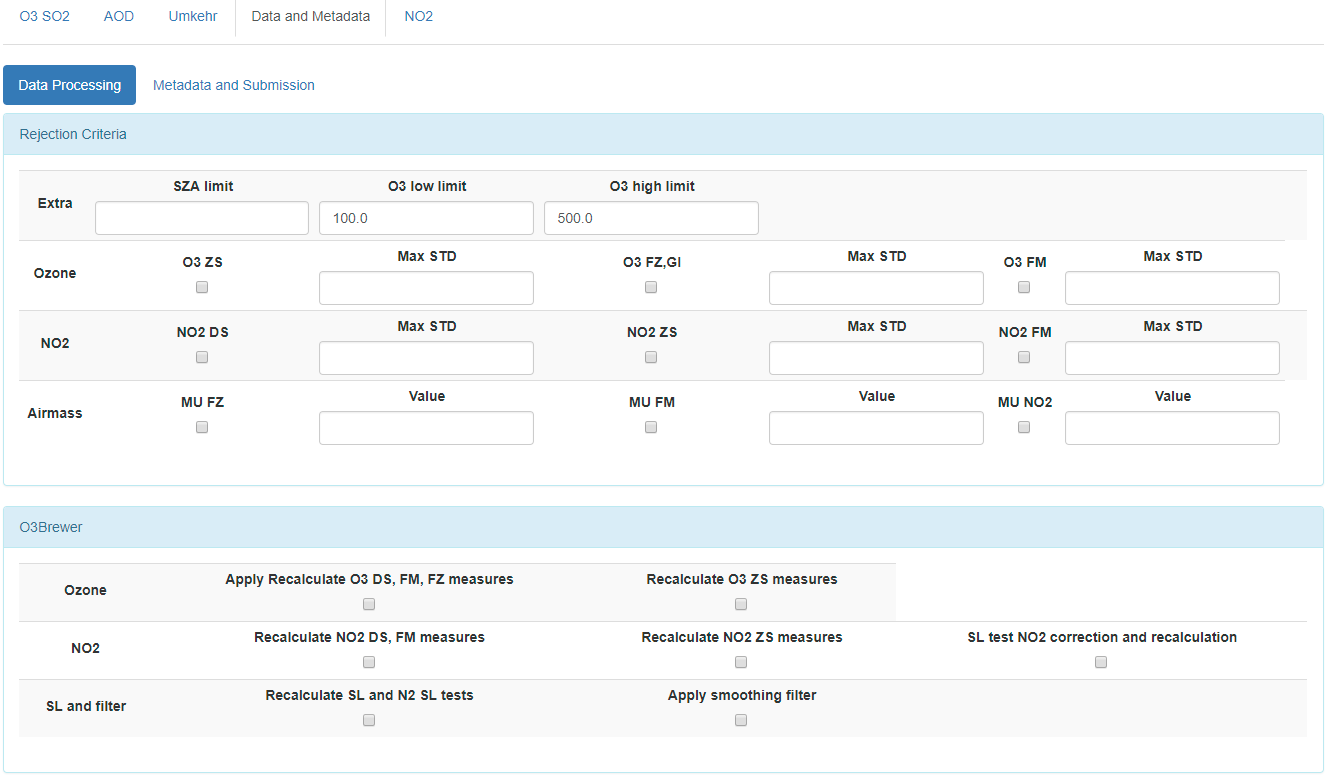
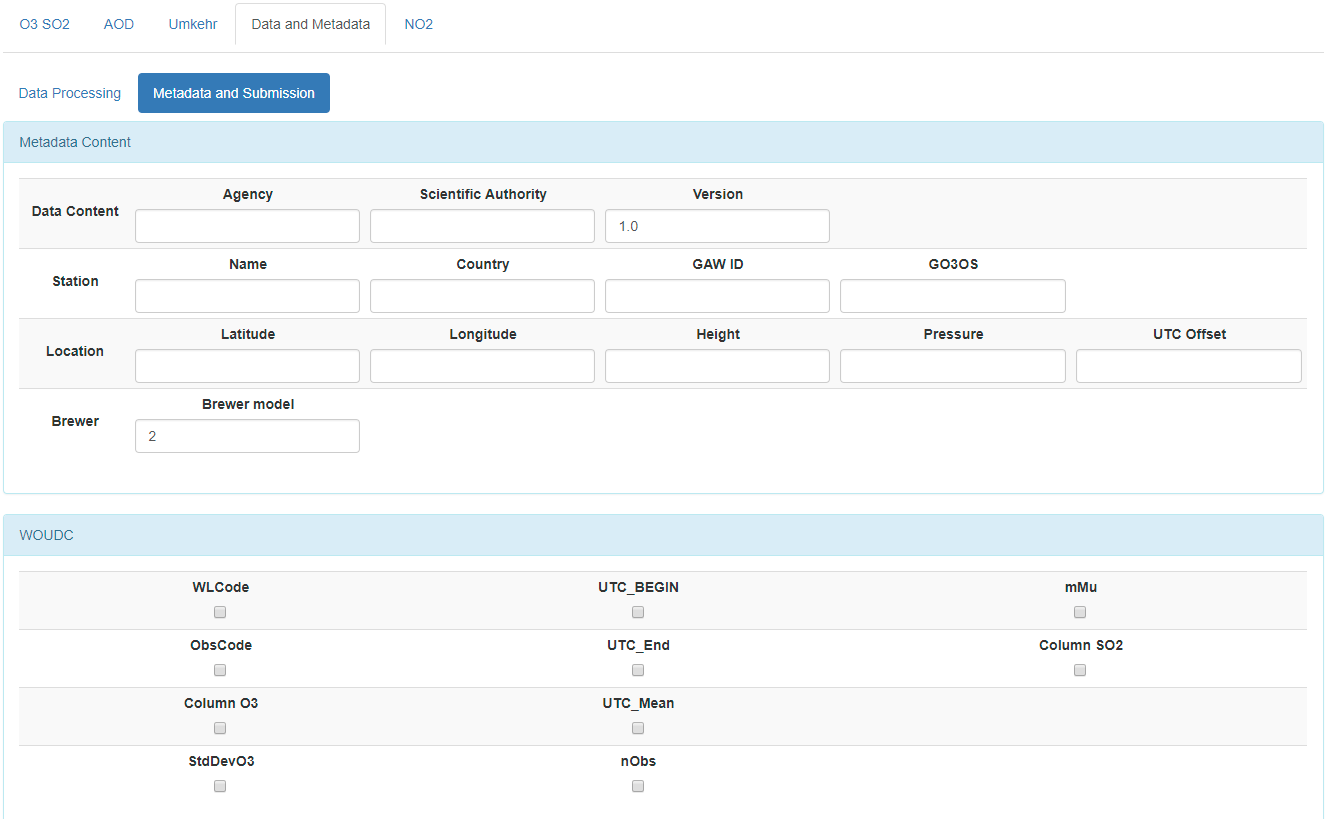
In this Section the user has the choice to fill the Data processing form and the Metadata and Submission form. The upper table in the Data processing form contains the rejection criteria for the final products. At the moment only the values in the first line of the table are operative. The SZA limit defines a maximum SZA above which the TOC is rejected. The O3 low limit and the O3 high limit define the limits between which the measured TOC is acceptable. These limits are applied on the product of levels 1.5 and 2. The O3brewer table contains a number of options existing in the O3brewer file, which however are currently inactive. Similarly, most options in the Metadata and Submission form are currently inactive. This form contains information which is planned to be used for direct submission of the data in the WOUDC database.
2.2.3. NO2
In this form, information regarding the production of NO2 can be provided, although the specific product is still under development.
2.2.4. Comments
A table wherein the operator can add his comments regarding the product and station configuration is available at the end of the page.
3. Download data
Registered users have the ability to download either the final Eubrewnet products (currently TOC) or the Brewer files which have been stored in the database. Downloading is possible either directly from the Eubrewnet interface or by using the proper access functions. In the following the process that has to be followed by the registered users so that they can download the data using the Eubrewnet interface is described, while the use of access functions is described in section 4.
3.1. Download Brewer files
The register user should first choose the Download files option shown in Figure 13. Then, a form providing the possible download options is appeared (Figure 14).
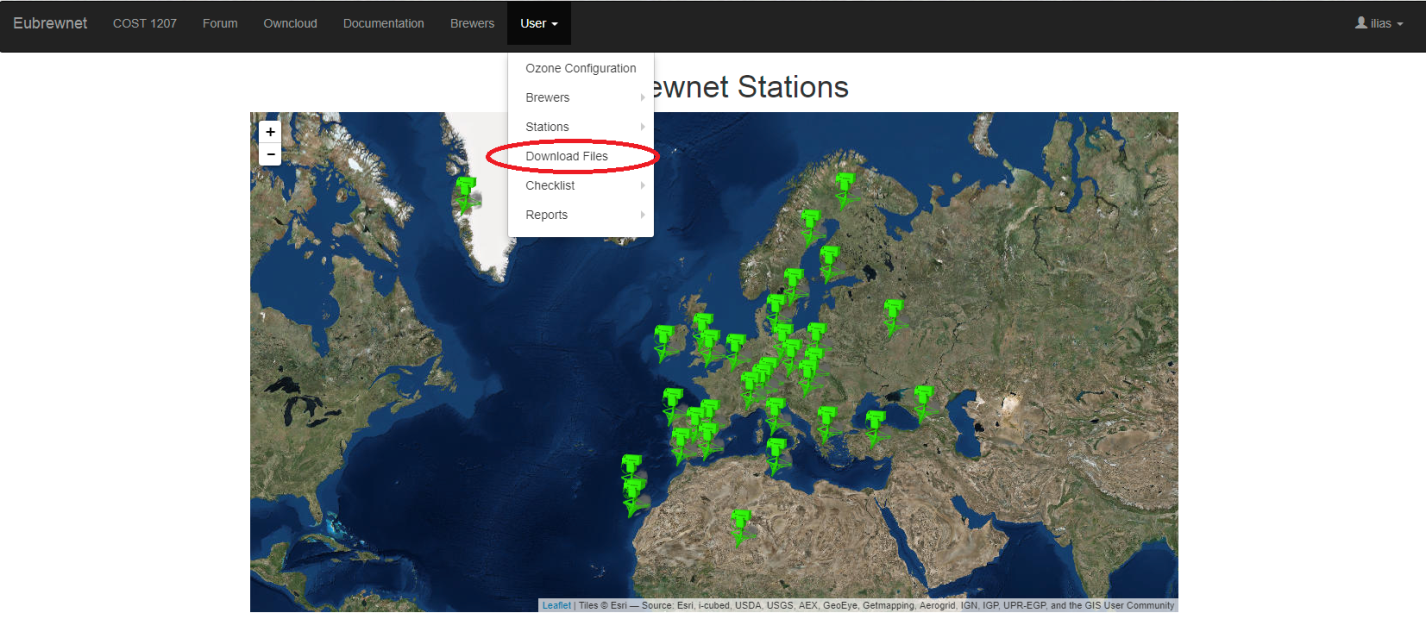 Figure 13: Brewer files downloading option
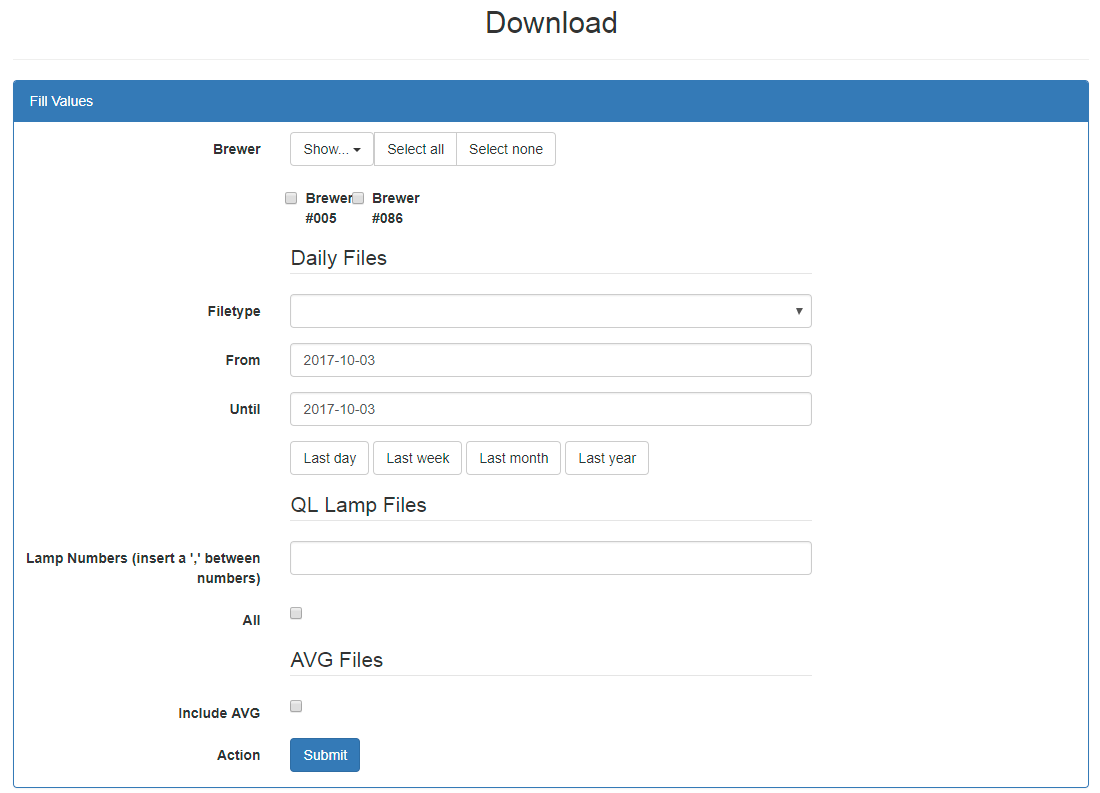 Figure 14: File downloading options
In the first line of the form the user can select the instruments for which he/she wants to download files. The “Show” button can be used to define which instruments will be displayed on the screen, and subsequently can be chosen for data downloading. The possible options are:
● all: all Brewers participating in Eubrewnet
● active: Brewers which send data regularly
● preferred: the Brewers for which the user is responsible. If the database user is not an operator no Brewer appears.
After choosing the instruments for which the files will be downloaded, the user should choose the type of files he/she wants from a list of several possible file-types, and the period for which the files will be downloaded. Note that not all the displayed file types are available for each instrument. The files are directly downloaded in a zip folder when the user presses the submit button.
3.2. Download products
In order to download TOC for a specific station, the user has to choose the station from the interactive map in the first page of the Eubrewnet interface. Then, a new page with information for the chosen station appears (Figure 15). By choosing product (currently only ozone is active) and product level for a specific date, the relative information is displayed visually. It is also possible to download the chosen product (for the chosen day, the chosen month or the entire chosen year) by following one of the links at the bottom left of the page. The downloaded product is in this case for the instrument with the lowest serial number (for Brewer with serial number 157 in the case of the presented example). If the user wants to download the product from another instrument then he/she has to follow the link for the instrument he/she wants.
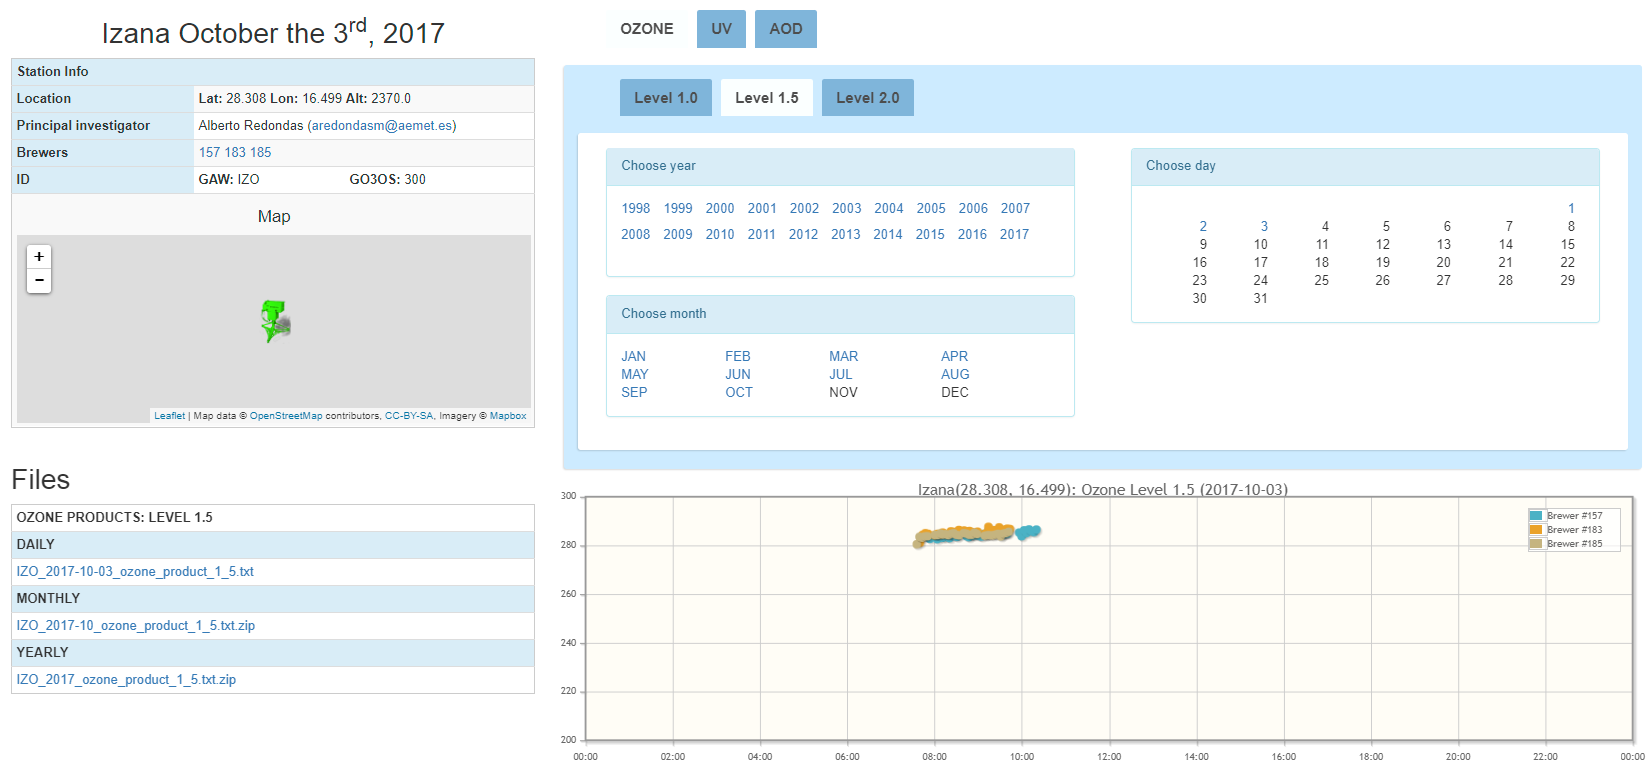 Figure 15: Information for the site of Izaña.
If the user chooses for example the Brewer with serial number 185, then a new page opens with information for the specific instrument. There, information regarding the instrument and the station is displayed, including the current TOC and UV index (if available) values and the status of the instrument. The user can scroll down and, in the Products section, choose the level and the date he/she wants and display visually the corresponding information.
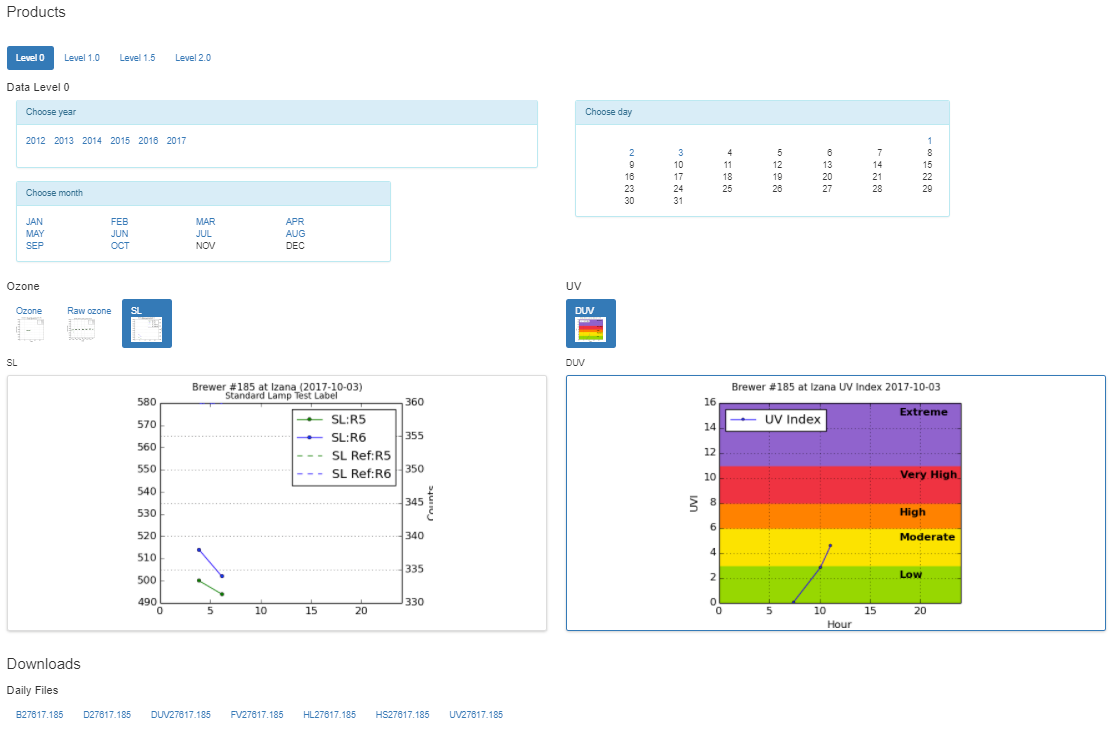 Figure 16: Products for the Brewer with serial number 185.
In the last section of the specific page (Downloads section) the products which are available for downloading are displayed. If the level 0 has been chosen (as in the example of Figure 16), the user has the option to download the files containing the raw data.
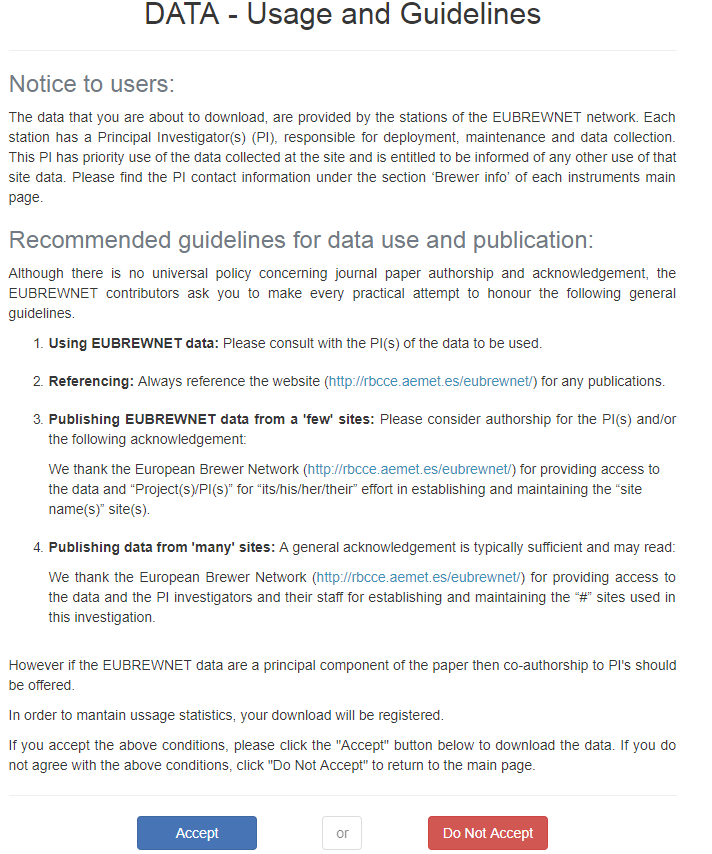
Before downloading the data the user has to accept the data usage conditions of Eubrewnet (see Figure 17). If the user does not agree with the terms in the “DATA-Usage and guidelines” form then he/she is redirected to the main page.
3.3. Ozone files format
In addition to the desired data, ancillary information can be found in the beginning of the ozone files as shown in the example of Figure 18. More specifically:
● Information regarding the level of the product.
● Information regarding the Eubrewnet data usage rules.
● Configuration information.
● Analytical information regarding the content of each of the 27 columns composing the provided data.
● A line with the data format of each line (which can be directly used in matlab).
● Short information regarding the content of each column.
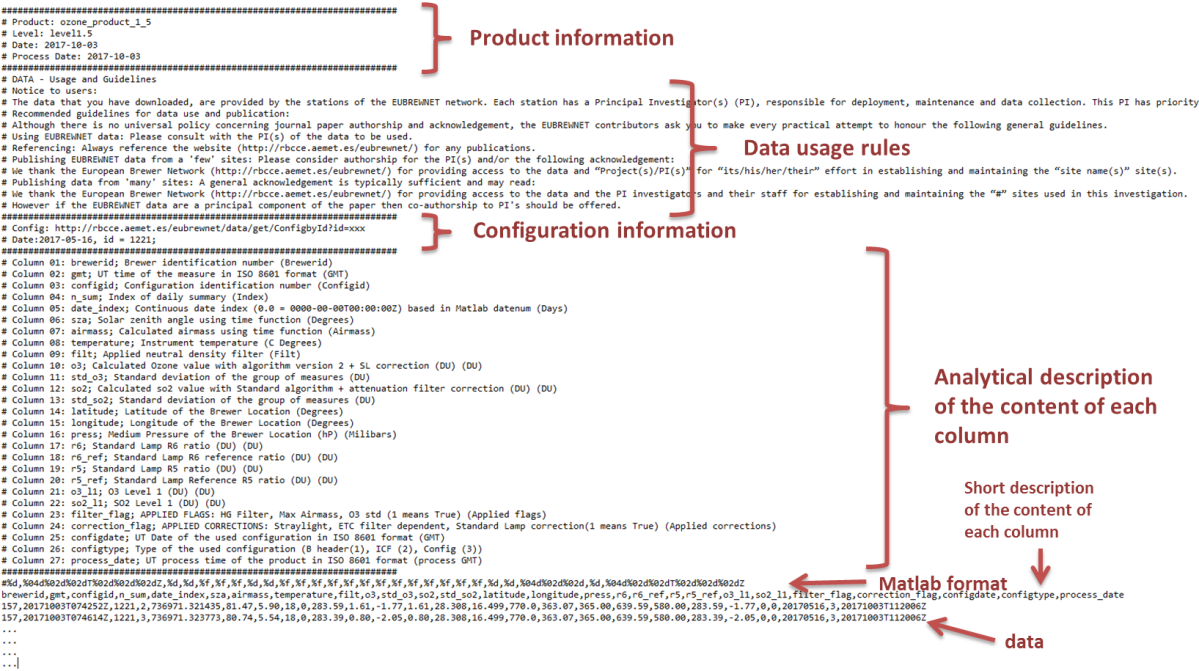 Figure 18: Example of the information contained in an ozone file downloaded from Eubrewnet.
As already discussed, more information is provided in the files, in addition to the date and the ozone and sulfur dioxide values. More specifically, each file contains the following 27 columns:
● Column 01: (brewerid) Brewer identification number (Brewerid)
● Column 02: (gmt) UT time of the measure in ISO 8601 format (GMT)
● Column 03: (configid) Configuration identification number (Configid)
● Column 04: (n_sum) Index of daily summary (Index)
● Column 05: (date_index) Continuous date index (0.0 = 0000-00-00T00:00:00Z) based in Matlab datenum (Days)
● Column 06: (sza) Solar zenith angle using time function (Degrees)
● Column 07: (airmass) Calculated airmass using time function (Airmass)
● Column 08: (temperature) Instrument temperature (C Degrees)
● Column 09: (filt) Applied neutral density filter (Filt)
● Column 10: (o3) Calculated Ozone value with algorithm version 2 + SL correction (DU) (DU)
● Column 11: (std_o3) Standard deviation of the group of measurements (DU)
● Column 12: (so2) Calculated so2 value with Standard algorithm + attenuation filter correction (DU) (DU)
● Column 13: (std_so2) Standard deviation of the group of measurements (DU)
● Column 14: (latitude) Latitude of the Brewer Location (Degrees)
● Column 15: (longitude) Longitude of the Brewer Location (Degrees)
● Column 16: (press) Medium Pressure of the Brewer Location (hP) (Milibars)
● Column 17: (r6) Standard Lamp R6 ratio (DU) (DU)
● Column 18: (r6_ref) Standard Lamp R6 reference ratio (DU) (DU)
● Column 19: (r5) Standard Lamp R5 ratio (DU) (DU)
● Column 20: (r5_ref) Standard Lamp Reference R5 ratio (DU) (DU)
● Column 21: (o3_l1) O3 Level 1 (DU) (DU)
● Column 22: (so2_l1) SO2 Level 1 (DU) (DU)
● Column 23: (filter_flag) APPLIED FLAGS: HG Filter, Max Airmass, O3 std (1 means True) (Applied flags)
● Column 24: (correction_flag) APPLIED CORRECTIONS: Straylight, ETC filter dependent, Standard Lamp correction(1 means True) (Applied corrections)
● Column 25: (configdate) UT Date of the used configuration in ISO 8601 format (GMT)
● Column 26: (configtype) Type of the used configuration (B header(1), ICF (2), Config (3))
● Column 27: (process_date) UT process time of the product in ISO 8601 format (process GMT)
4. Access functions
The registered users have access to functions which can be used to directly get the information they need (without downloading and processing the files containing this information). The root for all access functions is:
http://rbcce.aemet.es/eubrewnet/data/
If the user wants to use a specific function, then he/she should add the name of the function to the above link, followed by comments which specify how the function is going to be used. There are three different types of functions:
● Get functions: Can be used to access stored data, without further processing.
● Process functions: Can be used for processing on demand
● Update functions: Can be used by the operators to update the products of their Brewers.
The three different types of available functions are listed and shortly described in Tables 1, 2 and 3 respectivelly. The link in the last column is an example of getting data for the Brewer with serial number 157. The extended documentation for each function can be directly accessed in the Eubrewnet website by clicking on the links in the column Long Description. Extended description for each function is also provided in the following link:
http://rbcce.aemet.es/dokuwiki/doku.php?id=codes:dbaccess
Table 1:Eubrewnet access functions
| Function | Short Description | Long Description | Link |
| DS | Returns DS measurements | DS | Get DS |
| DSS | Returns the DS summaries | DSS | Get DSS |
| ZS | Returns ZS measurements | ZS | Get ZS |
| ZSS | Returns the ZS summaries | ZSS | Get ZSS |
| FM | Returns FM measurements | FM | Get FM |
| FMS | Returns the FM summaries | FMS | Get FMS |
| SL | Returns SL measurements | SL | Get SL |
| SLS | Returns the SL summaries | SLS | Get SLS |
| ConfigbyDate | Returns the available Configuration | ConfigbyDate | Get Config by Date |
| HG | Returns the mercury lamp tests | HG | Get HG |
| FV | Returns the FV tests | FV | Get FV |
| BFV | Returns the FV tests (from B file) | BFV | Get BFV |
| AP | Returns the AP tests (from B file) | AP | Get AP |
| SC | Returns the SC tests (from B file) | SC | Get SC |
| BHeader | Returns the B File Header with INST values | BHeader | Get BHeader |
| DTO3 | Returns the DTO3 tests (from B file) | DTO3 | Get DTO3 |
| RSO3 | Returns the RSO3 tests (from B file) | RSO3 | Get RSO3 |
| ActiveBrewers | Returns the number of Brewers whith at least one SL test by dates | ActiveBrewers | Get ActiveBrewers |
| FileStatus | Returns the status of the received files | FileStatus | Get FileStatus |
| Umkehr | Returns the Umkehr measurements | Umkehr | Get Umkehr |
| BfilesbyLocation | Returns the Available B files for a range of locations | BfilesbyLocation | Get Bfiles by Location |
| BrewerLocation | Returns the changes in location of a Brewer | BrewerLocation | Get Brewer Location |
| AVG | Returns the available AVG measurements | AVG | Get AVG |
| O3L1 | Returns the Level 1 of Ozone | O3L1 | Get O3L1 |
| O3L1_5 | Returns the Level 1.5 of Ozone | O3L1_5 | Get O3L1_5 |
| O3L2_0 | Returns the Level 2.0 of Ozone | O3L2_0 | Get O3L2_0 |
| DZ | Returns the DZ test results (used to get the dead time from the sun) | - | Get DZ |
| AvailableBfile | Returns the dates for which B files are available for a given period and a specific Brewer. | - | Get AvailableBfile |
| TableFields | Returns the fields of a specific table | - | Get TableFields |
| O3L1byStation | Returns the level 1 ozone product for a specified station. The ozone comes from the Brewer which is first in the priority list. If the product is not available from the particular Brewer, then it comes from any other Brewer from which it may be available. | - | Get O3L1byStation |
| O3L1_5byStation | Same as the previous function but returns the level 1.5 ozone product. | - | Get O3L1_5byStation |
| O3L2_0byStation | Same as the previous function but returns the level 2.0 ozone product. | - | Get O3L2_0byStation |
| dailyOzoneMean | Return the daily mean ozone for a given instrument and a given time period. | - | Get dailyOzoneMean |
| AllFiles | Returns a .zip file containing all files uploaded for a given Brewer and a given time period. | - | Get AllFiles |
| Files | Returns a .zip file containing the files of a specific type uploaded for a given Brewer and a given time period. | - | Get Files |
| StationConfig | Returns the station configuration | - | Get StationConfig |
| StationBrewerList | Returns the Brewer priority list, if a priority list is available. | - | Get StationBrewerList |
| CompareConfigs | Returns all configuration constants for the specified instrument and the specified date. | - | Get CompareConfig |
| NetworkStatus | Returns the status of the network (Total Brewers, Total Stations, Brewer sending data, Stations sending data) | - | Get NetworkStatus |
| Brewerlist | Returns the list of all registered Brewers | - | Get Brewerlist |
| Byearly | Returns the number of B files for each year for a specific Brewer. | - | Get Byearly |
| ByearlyB | Same as the Byearly function with a different format. | - | Get ByearlyB |
| SCP | Returns information for SC that have been performed between two dates and comply with the desired quality criteria. | - | Get SCP |
Table 2:process functions
| O3L1 | Returns the Level 1 of Ozone | O3L1 | Process O3L1 |
| O3L1_5 | Returns the Level 1.5 of Ozone | O3L1_5 | Process O3L1_5 |
| O3L2_0 | Returns the Level 2.0 of Ozone | O3L2_0 | Process O3L2_0 |
Table 3: update functions
| O3L1 | Update the Database content for the Level 1 of Ozone | O3L1 | Update O3L1 |
| O3L1_5 | Update the Database content for 1.5 of Ozone | O3L1_5 | Update O3L1_5 |
| O3L2_0 | Update the Database content for 2.0 of Ozone | O3L2_0 | Update O3L2_0 |
Functions’ input and output
Almost all functions can receive specific inputs and produce output files using four different formats. The common inputs and links to specific examples are provided in Table 4. The corresponding information for the output formats is provided in Table 5.
Table 4: Common functions’ inputs
| Parameter | Description | Example |
| brewerid | Brewer identification number | Get function with brewerid input parameter |
| date | Date in YYYY-MM-DD format | Get function with date input parameter |
| enddate | Date in YYYY-MM-DD format. If provided, the function will return the query in a date range | Get function with enddate input parameter |
Table 5:The four different ways of data access using the format input parameter.
| Format input | Description | Example |
| jsonM | JSON matrix formed by lists of lists (default value). The first list is formed by the parameters’ names and the following lists are the query outputs | Get DS by default |
| jsonO | JSON object of lists, where each key is the parameter name and its value is the time sorted list of them | Get DS with jsonO format |
| text | Human readable, comma separated values where first row is the parameters’ names and the following are the query outputs | Get DS with text format |
| csv | CSV direct download where first row displays the parameters’ names and the following rows are the query outputs | Get DS with text format |
| Example 3: Using the DS function The DS database access function provides the Direct Sun individual measurements as well as information from their summaries (e.g. temperature, the double ratios etc.) and a quality flag which denotes if they are between correct Mercury Lamp Tests. The minimum inputs are a brewerid and a date. In this case all the available information for the specific date is provided. For example: http://rbcce.aemet.es/eubrewnet/data/get/DS?brewerid=157&date=2016-01-01 Optionally, an enddate input parameter can be defined: http://rbcce.aemet.es/eubrewnet/data/get/DS?brewerid=157&date=2016-01-01&enddate=2016-01-07 If the enddate parameter is defined, then all information for the period between the date and the end date is provided. The default output format parameter is “text’. Though, a different output format can be defined. For example: http://rbcce.aemet.es/eubrewnet/data/get/DS?brewerid=157&date=2016-01-01&format=csv\\http://rbcce.aemet.es/eubrewnet/data/get/DS?brewerid=157&date=2016-01-01&format=csv In all the above examples the function output includes Direct Sun individual measurements and additional information coming from: ▪ DS Summary: temp (temperature), zenith_angle, airmass, double_ratio1, double_ratio2 ▪ B file: date (in ISO 8601 format) HG measurements: hg_test (0: measurement is not between two correct Hg tests; 1: measurement is between two correct Hg tests) |
5. Diagnostic tools
5.1. Brewer status
Eubrewnetweb interface provides access to a number of tools which can be used by the registered users to check the operational condition of each instrument. In the front page there is a map with the status of the Brewers which is stated using a code of colors:
● RED: CRITICAL
● ORANGE: ERROR
● YELLOW: WARNING
● GREEN: LATEST INFO RECEIVED TODAY
● GREY: LATEST INFO RECEIVED 24 HOURS AGO
● BLACK: LATEST INFO RECEIVED FIFTEEN DAYS AGO
To see the map (Figure 19) with the status of the Brewers, the registered user has to choose the option Brewers from the interface. Each Brewer represents a specific station, in which more than one Brewers may be operating. For each station, the status of the Brewer with the lowest serial number appears on the map. A list with the Brewers of the specific station appears when the user clicks on a brewer icon.
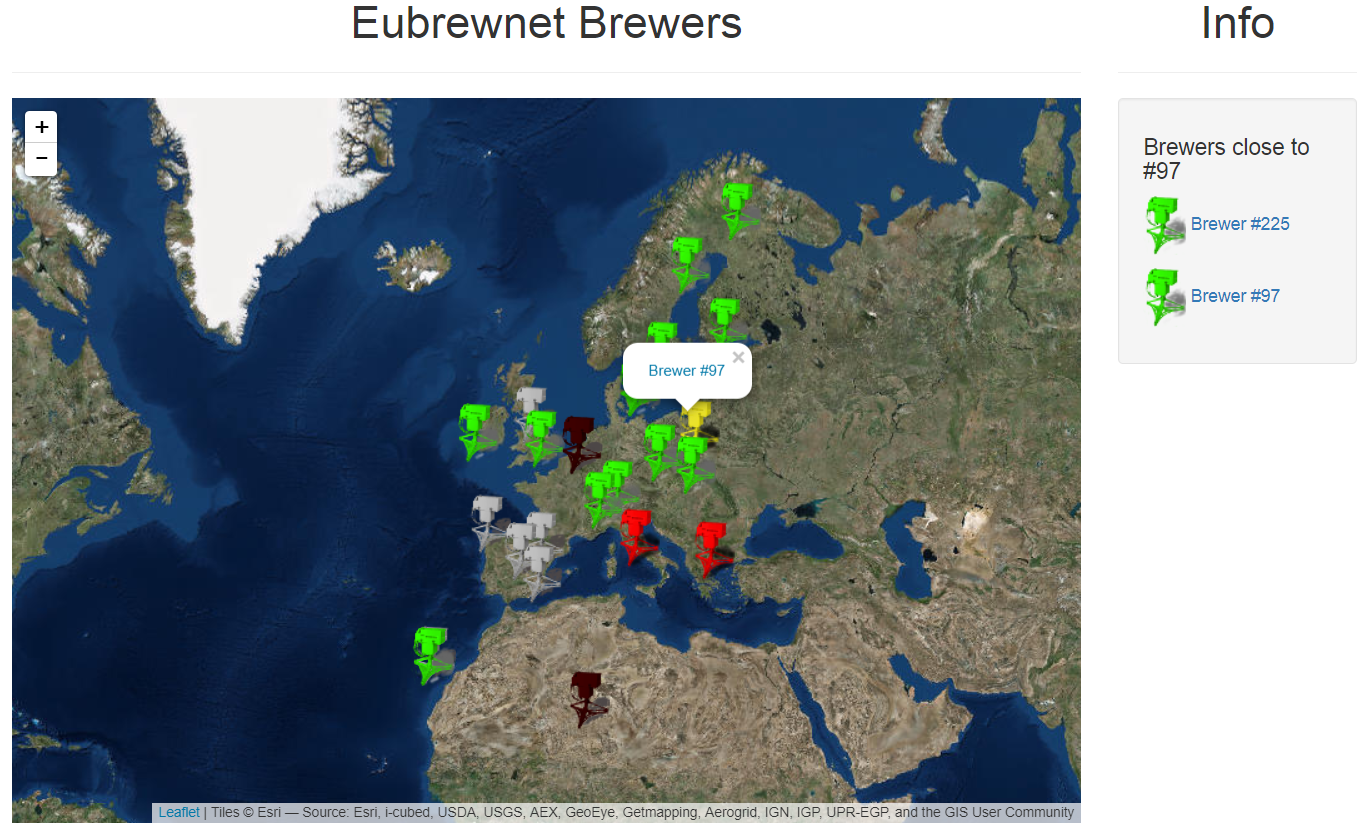 Figure 19:Interactive map with the Eubrewnet stations.
If a specific Brewer is chosen, the user is redirected to a page with details regarding the specific instrument. The page consists from four sections:
● a section with information for the instrument
● a section with the latest measurements
● a section where the measurements of the specific day are presented graphically and a choice to download products is provided (the same section shown in Figure 16)
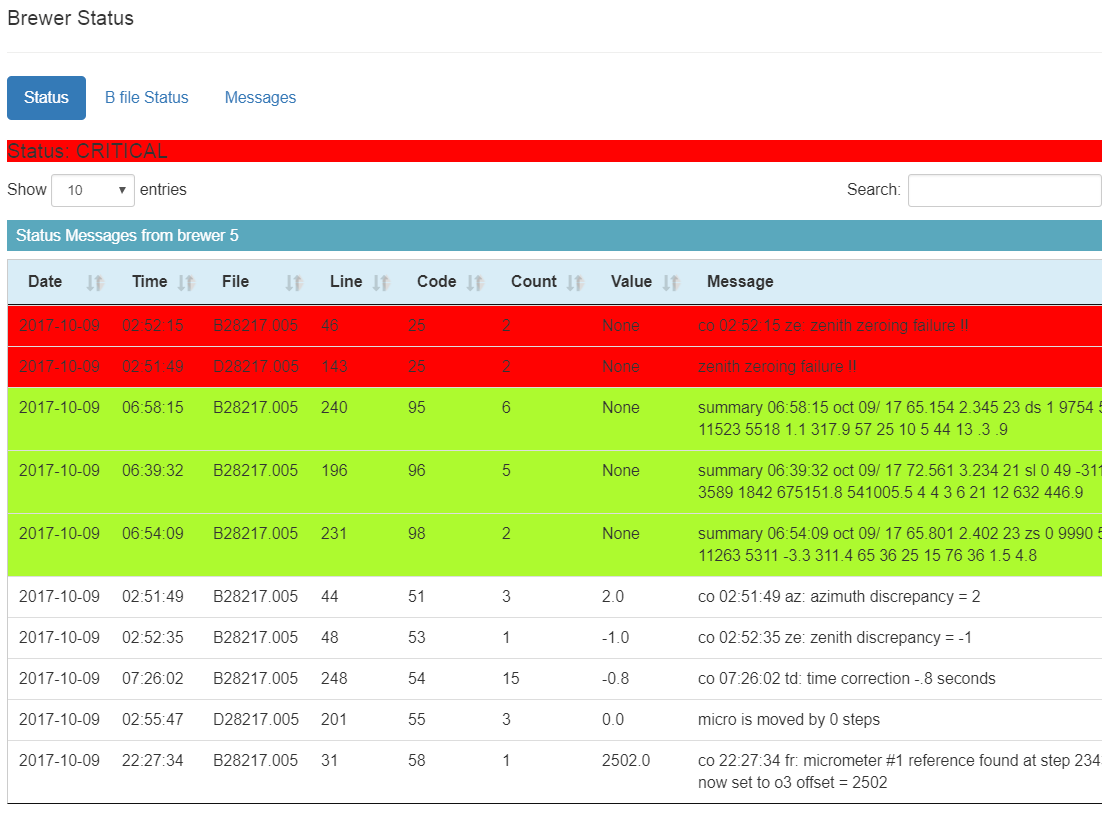
● a list of the original error messages from the D and/or B files in the Brewer status section.
The color of the messages in the Brewer status section depends on the information they provide (e.g. red colored messages are critical, yellow colored messages are warnings etc.). The Brewer status section is composed from two more subsections (in addition to the status subsection). The B file status subsection describes the condition of the B file for the current date, while the Messages subsection contains error messages of the file processing algorithm (e.g. if a line in the B file cannot be parsed properly).
5.2. Checklist
Online diagnostic tools are provided to the user so that he/she can evaluate the condition of the Brewer he/she wants. Brewers perform different diagnostic tests during the day, the results of which are recorded in the Brewer files (e.g. B files, .oavg files etc.). In Eubrewnet it is possible to analyze the content of these files at the request of the user. The user is then informed if the results fulfill the quality standards that have been set for the specific tests in the Eubrewnet algorithm.
From the user menu, the user should choose checklist and then check to get access to the specific diagnostic tool. There, the user can choose a specific Brewer and a specific date and then run the check list. The results are then listed in the tabs presented in Figures 21 – 25. More analytical details for the results of each diagnostic test can be found in the corresponding link.
 Figure 21:Tests regarding the instrument operation.
 Figure 22:Tests regarding the historical record of the Brewer diagnostics.
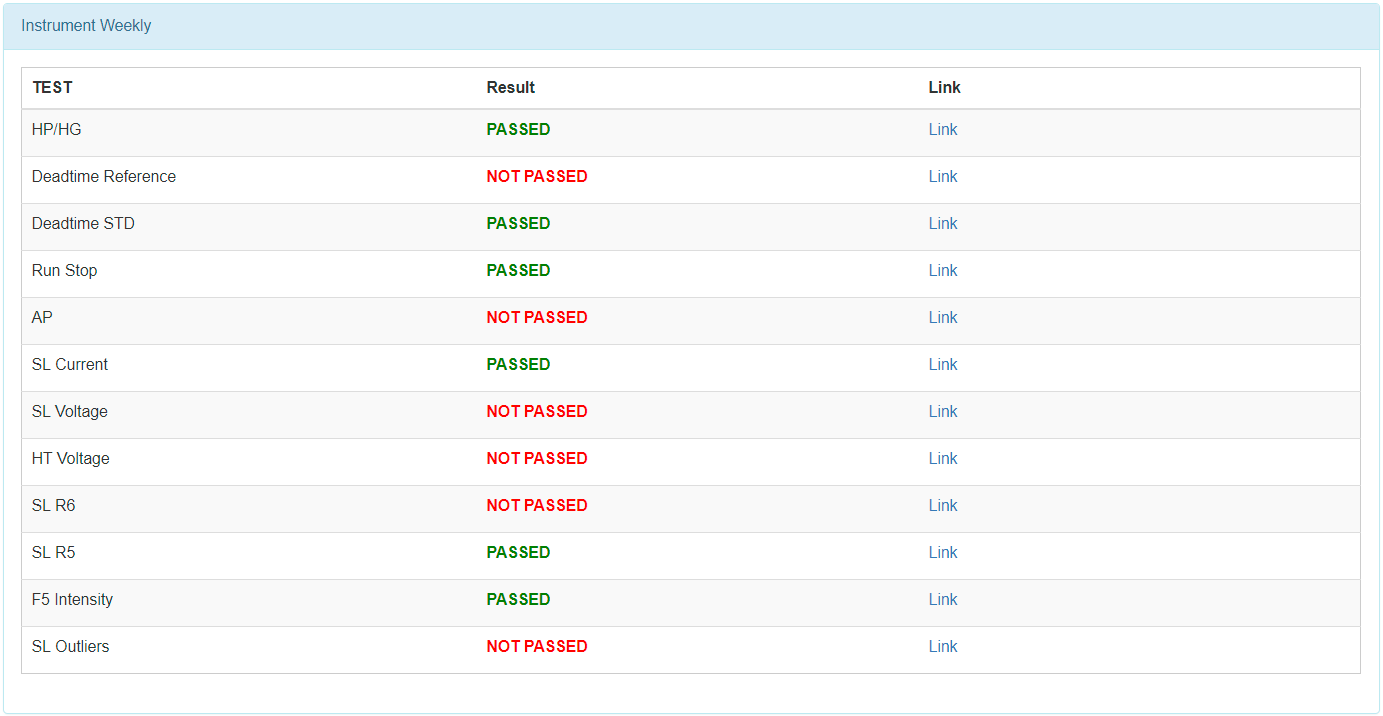 Figure 23:Tests regarding the last week record of the Brewer diagnostics.
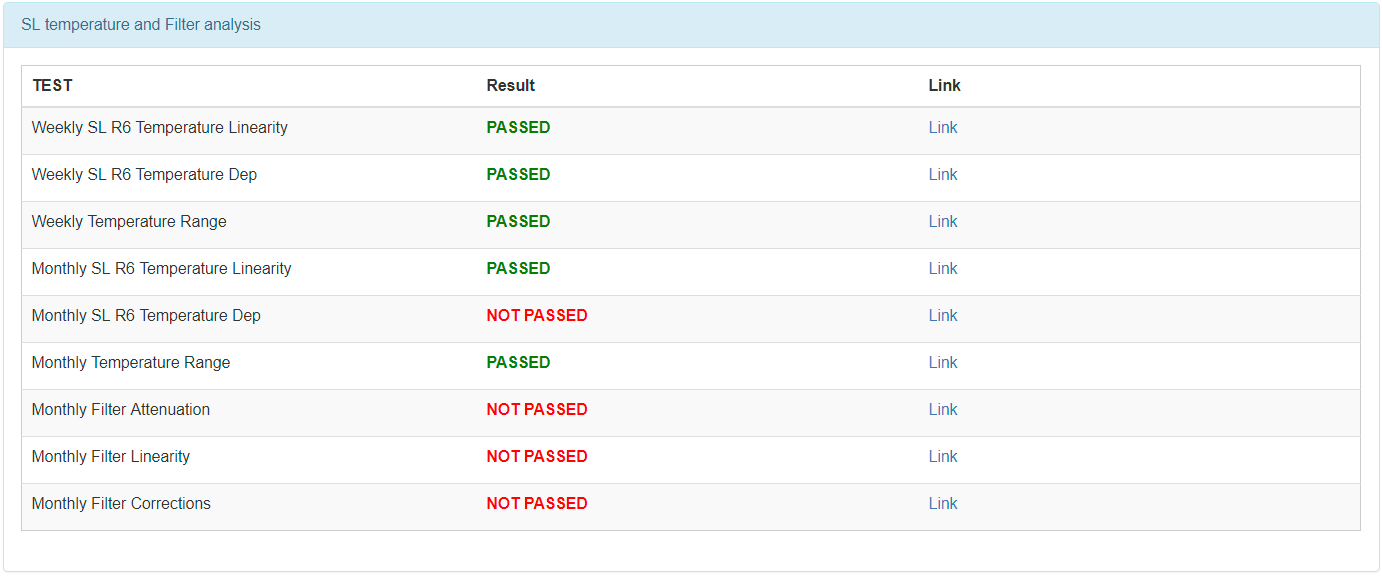 Figure 24:Tests regarding the sl temperature and the ND filters for the last week and the last month.
 Figure 25:Tests regarding the wavelength stability for the specific day.

